 Students at Burnaby North have access to a number of different technology supports. We have desktop computers (in labs and select classroom pods), laptop carts (for use in classrooms), and printing/copying/scanning facilities.
Students also have access to the school WiFi system so they can use their own personal devices for course support during class; their teachers can provide the login configuration instructions.
For students who may not have the technology they need at hand to complete their course work, the Library is the only computer/printing facility that is open outside of class time for walk-in use.
- Classes that are booked into the Library for a lesson have priority for all tech facilities.
 Students from other locations may access the Library Copier provided they have written permission from their classroom teacher and staffing levels allow.
- Students who wish to use the computers during a class must bring a note from their classroom teacher indicating which facilities they need. The Library cannot accommodate all requests depending on booking & staffing levels, so students may be sent back to class.
- Students with spare blocks in their timetable may access the Library during their spare by showing their timetable to Library staff near the entrance.
The Library has a selection of desktop and laptop computers and the only printing facility for students (without a class in a lab). Students are encouraged to use these facilities to complete their work well in advance, as the computers can fill up quickly and we often cannot accommodate last minute requests for access/support. Please check the Library hours to make sure you plan your time accordingly. NOTE: The Library may need to close at other times due to a lack of staff or event bookings. Check the Library door for updates.
A Guide to PaperCut for SD41 Students
Prepared by J. Cowley based on documents from P. Vossen & J. Chao
Printing with PaperCut
The district is moving to a cloud-based printing system where users can print from a computer and get their printing at any compatible printer in the building just by logging in to their account on the printer.
Currently, only the copiers are compatible with this system. Students working in a computer-based course in a lab will continue to print directly to the small printer in their lab until the device is upgraded. However, students who wish to retrieve their printing in the Library, can also print to the Library Copier from any school-issued computer or laptop.
NOTE: Mobile printing and printing from your own personal (BYOD) device is not possible at this time, but students no longer need to be using a computer IN the Library to print TO the Library.
Students may want to print in the Library for a few reasons:
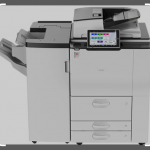 The Library is the only Computer Lab in the school that is open to students outside of class time. NOTE: Make sure you check the Library hours to make sure it will be open when you come to get your printing.
- The PaperCut copiers will only release a print job after users log into their account on the copier, so there is less risk that someone else will accidentally take your printing when they pick up their own.
- The Library Copier is the only student-accessible colour printer in the school. NOTE: There is a student-accessible B&W printer/copier in the 4th floor lounge.
NOTE: Print jobs sent to the copier will be held for 24 hours before being released. You can choose to let a print job expire and be deleted by the copier or you can manually delete it by selecting the checkbox in the print release screen and clicking the trash can icon instead of the Print button.
Users can also use the Library Copier to
- Copy documents (see the Device Functions section for instructions)
- Scan documents (see the Scan section for instructions)
- Depending on how their account is setup by the district, users may be able to scan to an email address (district Outlook addresses only) and/or to their network drive. This requires a brief additional setup process.
A. Setup your PaperCut Account
Before users can print to a cloud-print MFD (Multi-Function Device) or Copier, they must finalise setup in their PaperCut account. All district users have an account by default, but each user must define their own PIN to login on devices.
- Go to the following URL.: http://00papercut:9191/app REVISED: **You must do this from a school-issued device (desktop or laptop). You cannot access this page from home or from your BYOD device.
- Login with your network ID (Staff or Student Number) and network password.
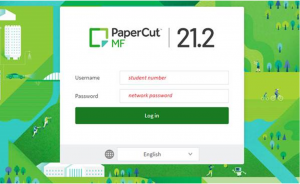
- Click on Change details link
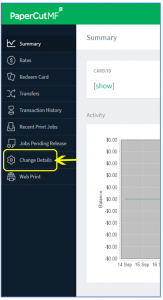
- On the new screen, you will create your PIN.
Choose something easy for you to remember but difficult for someone else to figure out. Do not select something obvious like 1234 or the first 4 digits of your Student Number.
- New PIN: Enter your desired 4 Digit PIN. (For example 2332)
- Verify new PIN: Re-Enter the desired PIN
- Change PIN: Click on the Change PIN button
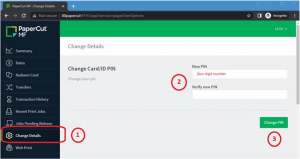
- Once you click Change PIN, you should receive a message, “your PIN has been successfully updated”.

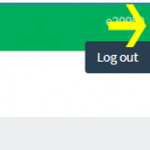
- Logout by clicking on your ID in the upper right corner and choosing Logout
B. Printing to the Public Printer(s)
- In order to print your document to the Library Copier, select the Print option in your document.
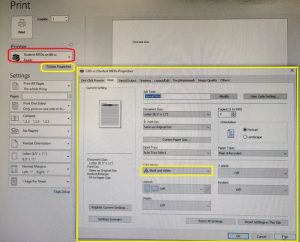
- On the Print screen, select the printer called “Student MFDs” (MFD=Multi-Function Device).
- The server name (e.g. 60-sc) will change depending on which school you are printing from. So printing sent to a printer “on 04-sc” will only be available for release on the printers at Burnaby North. Check with a staff member if the computer you are using has multiple versions of “Student MFDs” and you are unsure which one to select.
- The server name (e.g. 60-sc) will change depending on which school you are printing from. So printing sent to a printer “on 04-sc” will only be available for release on the printers at Burnaby North. Check with a staff member if the computer you are using has multiple versions of “Student MFDs” and you are unsure which one to select.
- You can change the print options un the “Settings” section under the Printer in the Print screen (like in the screenshot below from Word) or by clicking the “Printer Properties” or “Properties” button (name/location varies by software). The options available will vary depending on the device at your school. Printing will be in Black & White by default.
C. Logging In on a Copier
On the login Screen of the copier, please enter your username and PIN by following the onscreen instructions.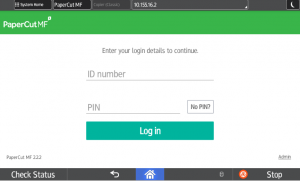
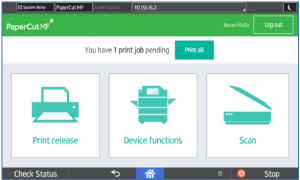 The PaperCut Interface consists of three buttons:
- Print Release:
- Device Functions
- Scan
Instructions for each of these buttons is included below.
D. Print Release
- To release ALL the documents you have sent to the printing system, click the Print All button at the top of the options.
- If you wish to print only some of your print jobs, press the Print Release You will be presented with your documents in the print queue. Select the checkbox to the left of the ones you require and press Print.
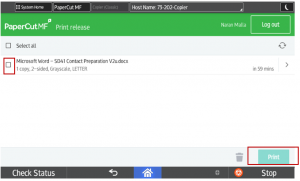
- If you encounter a problem (the red light begins flashing on the screen), contact a staff member to resolve the issue.
- Once finished printing, remember to Log Out.
E. Device Functions
Device Functions provides a user access to all of the copiers functions. These may vary depending on the device and your user account.
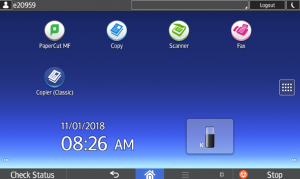 To make copies, press the Copy button (Copier Classic includes advanced settings few students will need).
- On the Copy screen, follow the on-screen options to select the size, type, and number of copies that you need to make. If you encounter a problem (the red light begins flashing on the screen and you see a pop-up message), do not touch the screen and immediately contact a staff member to resolve the issue.
- When your copies are done, retrieve them from the output tray and make sure they are what you expect. If they are not, return to the screen and make any adjustments you require before making another copy.
- Press the LOGOUT button on the Copier screen
F. Scan
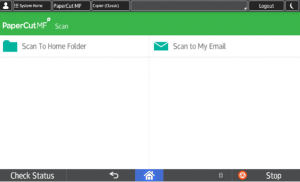 There are currently three scanning options available (these may vary depending on how the account has setup your account)
- Scan to OneDrive
- Scan to Home Folder
- Scan to Email
Scan to OneDrive
This will send the scan to a folder called ‘Scans for PaperCut MF’ in the App folder on your OneDrive.
- Place the document(s) you want to scan in the feeder tray or on the glass surface.
- Press Scan to OneDrive button
- Adjust any of the scan Settings if necessary (2-sided, format, colour etc…)
- Press the Start Scanning button.
- Press the Logout button.
IMPORTANT: On first use, you will receive an email from PaperCut requiring you to Log in to OneDrive. This is expected and required. Please authenticate with your district O365 username (e12345@burnabyschools.ca or 1234567@edu.burnabyschools.ca) and network password.
Scan To Home Folder
This will send the scan to a folder called ‘Scans’ in your H: drive. Because this is located in your H: drive files, it is only accessible on school computer (BYOD devices on the school network will not have access).
- Place the documents you want to scan in the feeder tray or on the glass surface.
- Select the Scan to Home folder option.
- Adjust any of the scan Settings if necessary (2-sided, format, colour etc…)
- Press Start Scanning.
- Press the Logout button.
Scan to My Email
This will send the scanned document to your district email account in Outlook.
- Place the document(s) you want to scan in the feeder tray or on the glass surface.
- Press Scan to My Email button
- Adjust any of the scan Settings if necessary (2-sided, format, colour etc…)
- Press the Start Scanning button.
- Press the Logout button.
Troubleshooting Printing
My print job is not in the Print Release list
If your print job is not available on the copier for print release, it is possible that it was printed to the wrong printer.
If you are printing in the Library, the correct printer may be selected by default, but the other labs in the school have their own local printers that take priority. If you are printing to the public student copier from a computer lab, check the local printer before you leave to ensure you don’t travel to the Library needlessly.
I cannot select the public printer
If you are having difficulty selecting the public copier “Student MFD” (for students), check that it is installed on the computer you are using.
Open the “Printers and Devices” app. Search in the Start Menu to locate it and open the app. NOTE: This function may be restricted on some student accounts. Ask a staff member if you need help.
Below is an example of the printers that will typically be installed for students at Burnaby North. “Student MFDs on 04-sc” may appear instead of “Student MFDs on 60-sc”. This is fine. It will work as described in the instructions.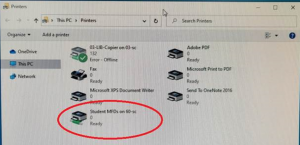
NOTE: The old printer that students used by default (e.g. 04-LIB-Printer1) may be in the list but is “offline” and will not function. Do not select it when printing.
If there is no “Student MFDs” printer listed, you will be unable to print to the public student MFD from that computer. BEFORE YOU LOG OFF, please speak to a staff member and have them report the error to the Tech Liaisons. They will need to tell us the physical location of the PC (room #) and the PC’s “Computer Name”, which is available in the System Information app (Start Menu search “System Information” to open).
Printing with PaperCut—Essential Steps
- Create your PIN for your PaperCut Account if you haven’t used it before.
- From a school computer, print your document to “Student MFDs”
- Go to the Library.
- On the copier, log in using your PaperCut Account info (username: yourstudentnumber PIN: thePINyoucreatedinstep1)
- Press the “Print All” button to release all your print jobs in the queue.
- Collect your printing from the output trays (check all of them).
- Press the LOGOUT button on the Copier screen (or others will have access to print or cancel any remaining documents in your print queue).